 This article describes a custom application that adds a "Send Alert" button on the Case Detail Record. The application basically does two things: (1) Sends an email status update to a distribution list of internal users, and (2) adds the status update as a Case Comment. This is the second in a series of articles describing how we implemented the feature, and pitfalls we ran into along the way.
In yesterday's blog, I described the basics of what we wanted to accomplish with the proposed "Send Alert" button. Today, I'll retrace our first steps, showing how we first "dipped our toes" in the Visualforce waters.
Ok ... How Do I Make a Visualforce Page, Anyway?
My first glimpse into Visualforce was during Marc Benioff's keynote at Dreamforce 2007. I'll confess to you right up front, the developers make this look EASY, but it took a little bit of stumbling before I made my first Visualforce page. Not to worry, it gets easier with practice!
At Dreamforce 2007, I had jotted down notes --pages of notes, actually -- and I flipped through them with enthusiasm. Enthusiasm turned to confusion, which turned to despair. I realized I had no idea where to begin. Apparently I'd left out some notes for making a Visualforce page.
I hit the Developer's Wiki: http://wiki.apexdevnet.com/index.php/Apex_and_Visualforce. If you've never been here, visit now!
There are a ton of videos, user guides, and "getting started" presentations for the aspiring Apex / Visualforce developer. I spent a good chunk of the day just watching the videos, and perusing the developer's guide. Eventually, I realized I was just procrastinating, and it was time to dig in.
I followed a step that I saw Ron Hess do in one of the video presentations; I typed the following URL into my browser:
https://na3.salesforce.com/apex/SendAlert
 (NOTE: If you're crazy enough to be following along, be sure that you substitute "na3" for the correct pod on which your instance of Salesforce runs, typically na1, na2, na3, na4, na5, etc.)
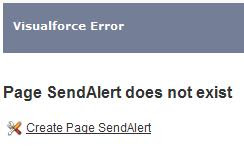
That's the simpler method of creating a new Visualforce page ... just add "/apex/page_name" to the end of your Salesforce pod name. Because the Visualforce page does not yet exist, the platform prompts you to create a new page.
Oooh, cool! I've played with plenty of HTML, so I could immediately see what was happening here. I resisted the urge to create my first Visualforce "Hello World" page, and plowed on with the application.
I copied the browser URL ("https://na3.salesforce.com/apex/SendAlert") to my clipboard, and then created a custom button for the Case object.
If you're following along at home (or work, or whatever):
- Click Setup --> Customize --> Cases --> Buttons and links
- Click NEW in the "Custom Buttons and Links" section
Make your custom button look like this.
Note that in the content section of the Browser, I've pasted the clipboard content, and then added "?={!Case.Id}" to the end. Whenever this "Send Alert" button is evoked from a Case Detail Page, it will open our new VisualForce page, with the current case record in "focus".
I added the custom button to our Case page layout:
- Click Setup --> Customize --> Cases --> Page Layouts
- Edit the appropriate "Case Layout"
- Click the "Detail Page Buttons" component, and then click "Edit Properties"
- Move the "Send Alert" button from the "Available Buttons" list to the "Selected Buttons" list.
So there's our button, and now we have a Case detail record in focus when we open the Visualforce Page. I modified the Visualforce page with some basic headers:
Pretty cool, pretty easy! Tomorrow we'll work on the input text box, and the rest of the Visualforce page.


No comments:
Post a Comment