Showing posts with label Visualforce. Show all posts

Sunday, December 18, 2022

How do you bind an Apex controller to a Visualforce page?

 In Visualforce, to reference an Apex method in the component markup, you must bind an Apex contoller to the Visualforce page. We do this by specifying  it as an attribute in the <apex:page> tag. 

Here's an example of how to do this:

<apex:page controller="MyController"> <!-- page content goes here --> </apex:page>

In this example, MyController is the name of the Apex controller class that you want to bind to the Visualforce page.

You can also specify multiple controllers by separating them with a comma, like this:

<apex:page controller="MyController1, MyController2"> <!-- page content goes here --> </apex:page>

It's important to note that the Apex controller class must be defined in your organization before you can bind it to a Visualforce page. 

public with sharing class MyController { // controller logic goes here }

Once you have defined your Apex controller class and specified it in the <apex:page> tag, you can use the controller's methods and variables in your Visualforce page to control the page's behavior and display dynamic content.


Thursday, September 25, 2008

Calendar Application in Visualforce


Check this out (click to enlarge)! It’s my latest Visualforce application, written with a little help from Ron Hess (Developer Evangelist, Salesforce.com).

Background: Our Customer Support organization schedules periodic Maintenance Windows with our customers. During these scheduled events (usually late evening / early morning), our Support team assists the customer with hardware / software upgrades, mass configuration changes on their equipment, or other “professional services”. Like any organization, we are resource constrained, so we must be careful to not overlap more than 2-3 maintenance windows during the same time period.

Project Need: The Support team wanted an application that allowed them to view all maintenance activity in a monthly calendar format.

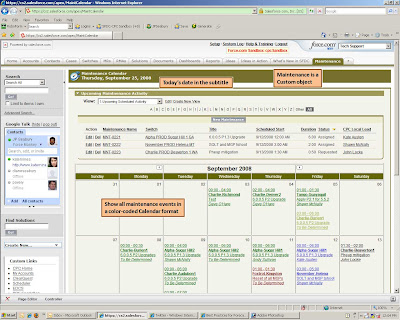
Here’s a screenshot of the custom tab, which uses Visualforce and Apex in it’s design. In Calendar mode, the user can see all the activities scheduled for the entire month. They can view activity from previous months, or future scheduled activity, at the click of a mouse.

Each scheduled item is color coded, based on the status of the maintenance activity:

- Black: Requested
- Blue: Scheduled / Resource Assigned
- Green: Success
- Red: Fail / Problems Encountered
- Olive Green: Cancellation

The color-coding updates automatically, whenever the case detail record status changes. For instance, when scheduled (blue) activity is finished, the Support Tech updates the status field in the Maintenance detail record. When this Calendar page is refreshed, the URL link to that activity changes from blue to green.

The Support Managers find this format much more practical than the custom Report / Dashboard views we had created for them previously. Those reports/dashboards provided the same information, but seeing the data in Calendar format is so much easier for them to see what's happening, and when.

This view helps prevent the scheduling of too many maintenance windows in a single night (although I'm going to add an Apex trigger to more tightly enforce that). The Calendar view also allows the support managers to look back at previous months, and see the volume of activity they've worked, including customer cancellations, failed activities, and successful acitivities. The data has always been in Salesforce, we're just displaying it in a different, more intuitive format -- and that's made a huge difference.

I mentioned earlier that this application was written with the help of Ron Hess. In truth, Ron unknowingly helped “jump-start” this project with his detailed post on the Salesforce.com Community forums. It's an old post, dating "way back" to April 2008. In that post, Ron provided some source code for a small calendar application he was using in conjunction with the Event object. I took snipets of that code, expanded on it, and my own calendar page then fell together quite easily.

That’s another great feature of Salesforce.com – the community forums are a great resource for getting information, ideas, and project “jump starts”.

Monday, September 15, 2008

Formating datetime variables in Apex

The current project I’m working on is a custom Visualforce page showing all of the scheduled maintenance activities my Support department has scheduled with our Customers. We have a custom object (Maintenance__c) which describes the details for the maintenance activity, including Start Date/Time and End Date/Time. I wanted to display this information in Calendar format using Visualforce. That way, my users can see, at a glance, what activities are scheduled throughout the month. I’ll show more of the application, as it develops, but for now I’ll focus on my first crisis.

The Problem: I wanted to display the current date in the subtitle of the section header. The code that does this is highlighted in the Page Editor section below, and the Visualforce page is right above it. It looks … fine. But I’m really, really fussy when it comes to page views. I didn’t like how the {!Today()} function returned “00:00:00 GMT” in the middle of the datetime output. Yuck! I wanted to see the information displayed in the “long date” format, just like I see in my Excel worksheets: “Monday, September 15, 2008”. I also didn’t like the fact that the datetime was GMT time, and my users would be mostly viewing this page from Eastern, Mountain or Pacific Time Zones. Apex to the rescue!


The Solution: I haven’t done much date manipulation in Apex, so I pulled out my trusty Apex Language Reference Manual. On page 182, the manual describes how you can use the “format” instance method to manipulate the date format: “format” takes a Java Class SimpleDateFormat string and the local time zone of the current user, and returns the datetime as a string. Perfect!

But what the heck is a “Java Class SimpleDateFormat” string? The document provided a link to the Java Sun website, where I learned all about date and time patterns, and using pattern letters to display full form vs. abbreviated form in datetime strings.

I switched over to my Sandbox, built a very simple Apex class to display the datetime in Microsoft (?) long date format:

public class MaintCalendar {

String LongDate = ' ';

// Init cLongDate with the current Datetime in long date format
public String getLongDate() {
Datetime cDT = System.now();
LongDate = cDT.format('EEEE, MMMM d, yyyy');
return LongDate;
}

}


The first line in my getlongDate method initializes the ‘cDT’ variable with the current datetime. The second line uses the “format” instance method to set a global string variable “LongDate”, using the following SimpleDateFormat string: ‘EEEE, MMMM d, YYYY’ The four letters indicate that the Day, Month and Year should be spelled out in full (non-abbreviated) form.

The code (and the VF page output) is displayed below.


Phew! Am I glad I figured that out. Every time I started working on the Calendar code, that ugly default date format in the {!Today()} function mocked me, telling me that I was making an ugly UI. Well, that’s enough code for this week … for some reason I now have a craving for orange creamsicles. Need to go find an ice cream truck.

Friday, August 29, 2008

VisualForce App - Send Alert Button (Part 3) : Fleshing Out the Visualforce Page

This article describes a custom application that adds a "Send Alert" button on the Case Detail Record. The application basically does two things: (1) Sends an email status update to a distribution list of internal users, and (2) adds the status update as a Case Comment. This is the third in a series of articles describing how we implemented the feature, and pitfalls we ran into along the way.

Here is a code drop of the final Visualforce page behind the Send Alert button, which we previewed in Part 2:

WARNING: I'm finding that Blogger is a HORRIBLE medium for posting code like this, at least with the current template. I'm working on a website where I can post these code samples, and make it easier for readers to grab them. Hope to have that online in a week or two! In the meanwhile, my appologies for the ugly rendering in Blogger!


<!-- Alert Notification Wizard -->
<apex:page controller="SendAlertController">
<apex:sectionHeader title="Active Alert - Status Update" subtitle="Internal CPC Notification Only"/>
<apex:pageBlock >
This is an Internal (Cedar Point) <b>Sev {!Case.Priority} ALERT</b> Status Update for the <b>{!Account.Name}</b> Account Team.
</apex:PageBlock>
<apex:form >
<apex:pageBlock title="Current Status Update">
<apex:pageBlockButtons >
<apex:commandButton action="{!send}" value="Send Update"/>
<apex:commandButton action="{!sendfinal}" value="Send Final Update"/>
<apex:commandButton action="{!cancel}" value="Cancel"/>
</apex:pageBlockButtons>
<apex:pageBlockSection columns="1">
<apex:pageBlockSectionItem >
<apex:outputLabel value="Send To:" for="sendTo"/>
<apex:outputText value="Account Team Members plus {!sendtogroup} Group" id="sendTo"/>
</apex:pageBlockSectionItem>
<apex:pageBlockSectionItem >
<apex:outputLabel value="Account Team Members:" for="teamMembers"/>
<apex:outputText value="{!teamMemberNames}" id="teamMembers"/>
</apex:pageBlockSectionItem>
<apex:pageBlockSectionItem >
<apex:outputLabel value="Alert Group Members:" for="groupMembers"/>
<apex:outputText value="{!groupMemberNames}" id="groupMembers"/>
</apex:pageBlockSectionItem>
<apex:pageBlockSectionItem >
<apex:outputLabel value="Additional To:" for="moreto"/>
<apex:inputTextarea id="moreTo" value="{!moreTo}" rows="1" cols="100"/>
</apex:pageBlockSectionItem>
<apex:pageBlockSectionItem >
<apex:outputLabel value="Subject:" for="subject"/>
<apex:outputText id="subject" value="{!subject}"/>
</apex:pageBlockSectionItem>
<apex:pageBlockSectionItem >
<apex:outputLabel value="Priority" for="priority"/>
<apex:outputField value="{!Case.Priority}" id="priority"/>
</apex:pageBlockSectionItem>
<apex:pageBlockSectionItem >
<apex:outputLabel value="Case" for="caseNum"/>
<apex:outputLink value="/{!Case.Id}" id="caseNum">{!Case.CaseNumber}</apex:outputLink>
</apex:pageBlockSectionItem>
<apex:pageBlockSectionItem >
<apex:outputLabel value="Description" for="caseDesc"/>
<apex:outputField value="{!Case.Subject}" id="caseDesc"/>
</apex:pageBlockSectionItem>
<apex:pageBlockSectionItem >
<apex:outputLabel value="Switch" for="caseSwitch"/>
<apex:outputText value="{!SwitchName}" id="caseSwitch"/>
</apex:pageBlockSectionItem>
<apex:pageBlockSectionItem >
<apex:outputLabel value="SW Rel" for="caseSwRel"/>
<apex:outputText value="{!SwitchRel}" id="caseSwRel"/>
</apex:pageBlockSectionItem>
<apex:pageBlockSectionItem >
<apex:outputLabel value="Opened" for="caseCreatedDate"/>
<apex:outputField value="{!Case.CreatedDate}" id="caseCreatedDate"/>
</apex:pageBlockSectionItem>
<apex:pageBlockSectionItem >
<apex:outputLabel value="Status Update" for="statusUpdate"/>
<apex:inputTextarea id="statusUpdate" value="{!comment.CommentBody}" rows="8" cols="100"/>
</apex:pageBlockSectionItem>
</apex:pageBlockSection>
</apex:PageBlock>
</apex:form>
<!-- <apex:detail /> -->
</apex:page>


That's the code, and here's what the final page looks like when rendered in a Visualforce page:

Wednesday, August 27, 2008

VisualForce App - Send Alert Button (Part 2) : How do I make a Visualforce Page, anyway?

This article describes a custom application that adds a "Send Alert" button on the Case Detail Record. The application basically does two things: (1) Sends an email status update to a distribution list of internal users, and (2) adds the status update as a Case Comment. This is the second in a series of articles describing how we implemented the feature, and pitfalls we ran into along the way.

In yesterday's blog, I described the basics of what we wanted to accomplish with the proposed "Send Alert" button. Today, I'll retrace our first steps, showing how we first "dipped our toes" in the Visualforce waters.

Ok ... How Do I Make a Visualforce Page, Anyway?

My first glimpse into Visualforce was during Marc Benioff's keynote at Dreamforce 2007. I'll confess to you right up front, the developers make this look EASY, but it took a little bit of stumbling before I made my first Visualforce page. Not to worry, it gets easier with practice!

At Dreamforce 2007, I had jotted down notes --pages of notes, actually -- and I flipped through them with enthusiasm. Enthusiasm turned to confusion, which turned to despair. I realized I had no idea where to begin. Apparently I'd left out some notes for making a Visualforce page.

I hit the Developer's Wiki: http://wiki.apexdevnet.com/index.php/Apex_and_Visualforce. If you've never been here, visit now!

There are a ton of videos, user guides, and "getting started" presentations for the aspiring Apex / Visualforce developer. I spent a good chunk of the day just watching the videos, and perusing the developer's guide. Eventually, I realized I was just procrastinating, and it was time to dig in.

I followed a step that I saw Ron Hess do in one of the video presentations; I typed the following URL into my browser:

https://na3.salesforce.com/apex/SendAlert

(NOTE: If you're crazy enough to be following along, be sure that you substitute "na3" for the correct pod on which your instance of Salesforce runs, typically na1, na2, na3, na4, na5, etc.)

That's the simpler method of creating a new Visualforce page ... just add "/apex/page_name" to the end of your Salesforce pod name. Because the Visualforce page does not yet exist, the platform prompts you to create a new page.


Oooh, cool! I've played with plenty of HTML, so I could immediately see what was happening here. I resisted the urge to create my first Visualforce "Hello World" page, and plowed on with the application.


I copied the browser URL ("https://na3.salesforce.com/apex/SendAlert") to my clipboard, and then created a custom button for the Case object.

If you're following along at home (or work, or whatever):


  1. Click Setup --> Customize --> Cases --> Buttons and links

  2. Click NEW in the "Custom Buttons and Links" section
    Make your custom button look like this.

Note that in the content section of the Browser, I've pasted the clipboard content, and then added "?={!Case.Id}" to the end. Whenever this "Send Alert" button is evoked from a Case Detail Page, it will open our new VisualForce page, with the current case record in "focus".


I added the custom button to our Case page layout:


  1. Click Setup --> Customize --> Cases --> Page Layouts

  2. Edit the appropriate "Case Layout"

  3. Click the "Detail Page Buttons" component, and then click "Edit Properties"

  4. Move the "Send Alert" button from the "Available Buttons" list to the "Selected Buttons" list.

So there's our button, and now we have a Case detail record in focus when we open the Visualforce Page. I modified the Visualforce page with some basic headers:


Pretty cool, pretty easy! Tomorrow we'll work on the input text box, and the rest of the Visualforce page.

Sunday, July 27, 2008

Insomnia


It's back, my dear old friend, Insomnia. Although it's different for me. I don't lie prone in bed, gazing wide-eyed at the cieling. Instead, I sit hunch-back over my keyboard, banging out code and crawling through the web.

Lately, I've been taking a deep dive into Apex and Visualforce, and it's really cool stuff. So cool, in fact, that I'll suddenly be concious of the birds chirping outside my window, and realize that I've been up all night coding again. My last meal was a soggy tuna sandwich about 16 hours earlier.

I do a lot of freelance work, but the current project is for my employer. My boss wants a feature added to Salesforce.com that allows his technical team to send a periodic email status update to various internal audiences when a high priority Case is opened. The tricky part is that there are different rules as to who the email should be sent to, depending on the severity (priority) of the Case and the Customer (Account) who opened the case, and the mail distribution rules change pretty frequently. The users can't easily keep track of these rule changes -- so we're going to let Salesforce.com do it for them. They just need to post the update, and my code under the hood will handle the email template preparation and distrubtion.

Before, I would have just banged this out with an S-control, but I thought I'd try this out with a combination of Apex and VisualForce pages instead. So I added a "Send Alert" button to the Case detail record page layout, and now I'm fighting the learning curve to implent this functionality in Visualforce.

I've poured through wikis, webinars and documentation posted on the Apex Developer Net forums. My mind loses all track of the passage of time, including recollection of when I last slept, when I last ate, when I last interacted with the human race. Still, I've learned a lot, and my "Send Alert Notification" components and pages are looking pretty slick.

I have to shift gears now, because I've been doing all my development (so far) in a production environment ... so naughty, I know. Last night, I hit a wall and realized I needed to create a new Apex Class, and it took me way too long to realize that the reason I couldn't make one was because I wasn't in a Developer edition or sandbox. Ooops.

I haven't done enough with the Sandbox, so now I need to go study up on it. I'll come back and share what I learn.